

How to restore your WordPress Xcloner backup from Koofr via WebDAV
If you own a website, you know that it's important to back up your website regularly. It's equally important that those backups work well so that we're not left without our website in case of necessary disaster recovery. Read how to restore your WordPress website backup from your Koofr account with Xcloner Plugin using WebDAV protocol.
Written by human for humans
If you are a website owner it is important you do regular backups of your website. There is no doubt about that. But, what is equally as important is, that those backups work well. We set out to test the second part of Xcloner Backup and Restore Plugin for WordPress - its restore function. We wanted to know that in case disaster recovery is needed, we can be confident we are covered with our backup that is safely stored in Koofr.
Why should you do backups anyway?
Why are backups necessary anyway? If you don't know yet, let us explain. Many things can go wrong. And things do go wrong all the time. These are only a few examples. You can lose part of your website database; you can delete part of your website by accident. In the worst-case scenario, the server where you are hosting your website stops working or your database is modified by a hacker. In all of these and other cases, you’re going to need a backup of your precious site, that you probably spent a while building. But every backup also needs to be tested. Always. If we are to rely on it we need to be sure it works.
How to test the restore function of Xcloner Plugin?
We assumed we were going to do a full restore of our WordPress website from our Xcloner backup files, into an empty WordPress. We also assumed we lost everything, aside from our Xcloner backup and we have to start anew with only our backup and build our webpage back up from that. The last assumption we made was that we have the Xcloner backup saved in our Koofr account, or in terms of Xcloner - in our Remote Storage Account.
How can you restore your site?
(1) First, you need to set up a blank WordPress site.
(2) Next, install Xcloner Backup and Restore Plugin to your blank WordPress and connect it to Koofr through WebDAV.

You can see the WebDAV connection settings in our blog How to backup your WordPress site to Koofr with WebDAV under points (5), (6) and (7).
Note: You'll need to generate a new App password in your Koofr account to connect Xcloner to Koofr via WebDAV. See video tutorial How to generate application-specific passwords for WebDAV connections in Koofr on how to do that.
(3) When you set up the WebDAV connection to Koofr, click on Manage Backups in Xcloner Plugin Menu in WordPress and select WebDAV from the drop-down list in the top right corner.
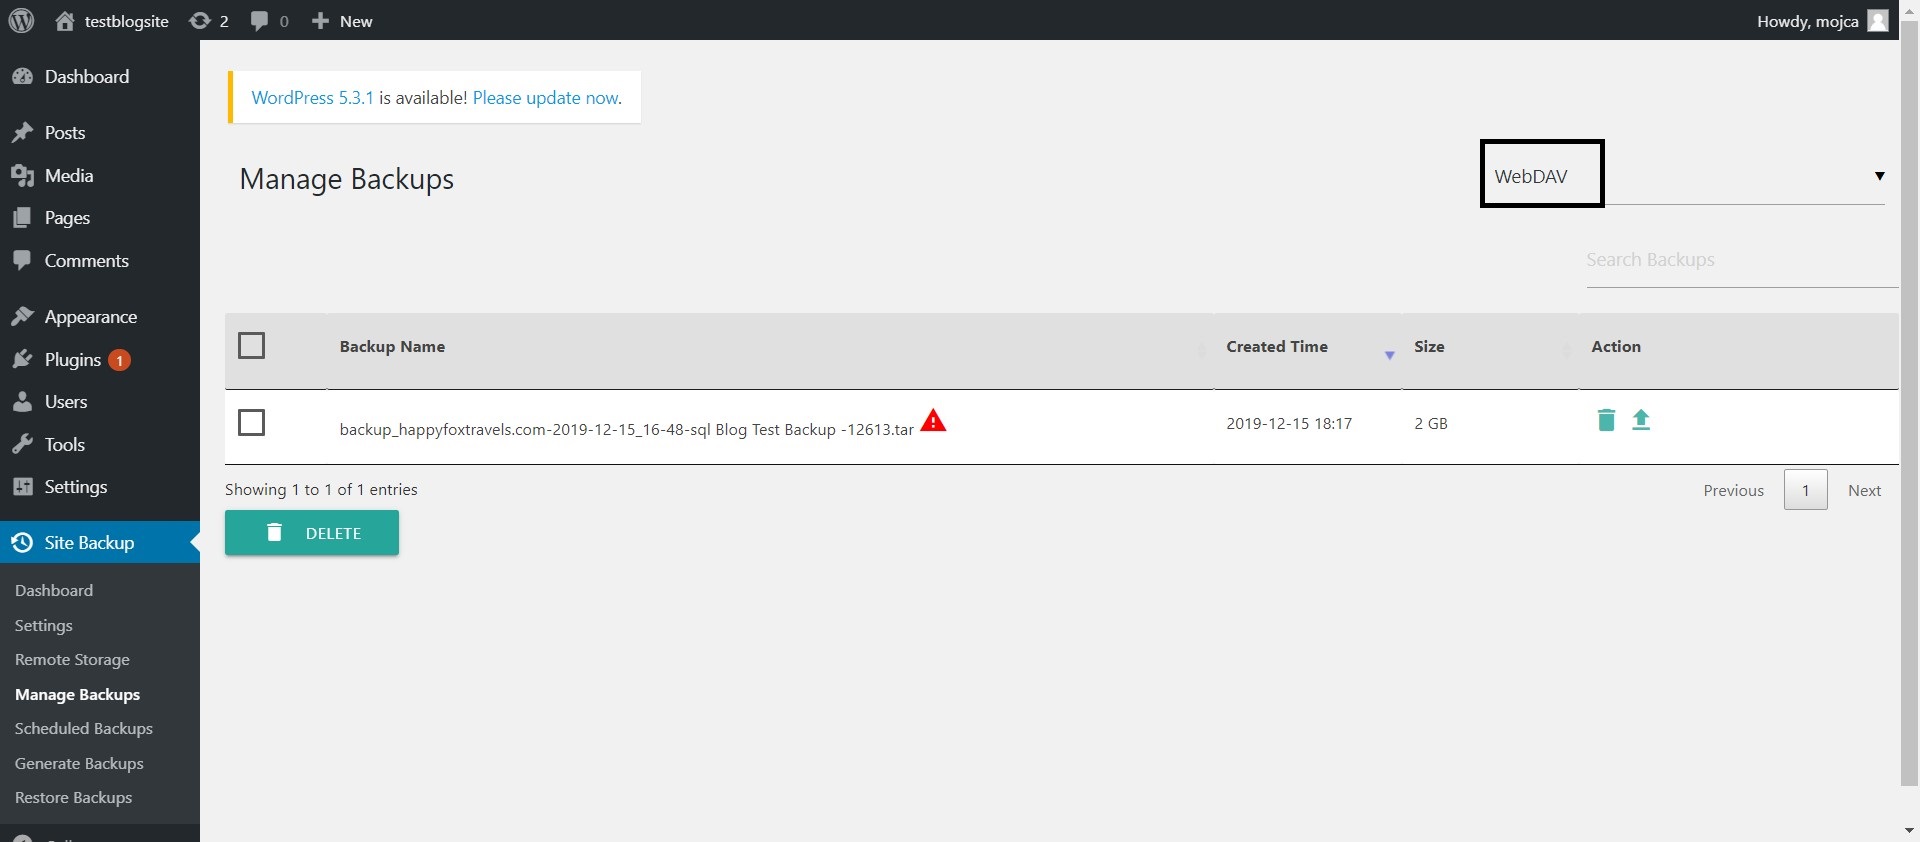
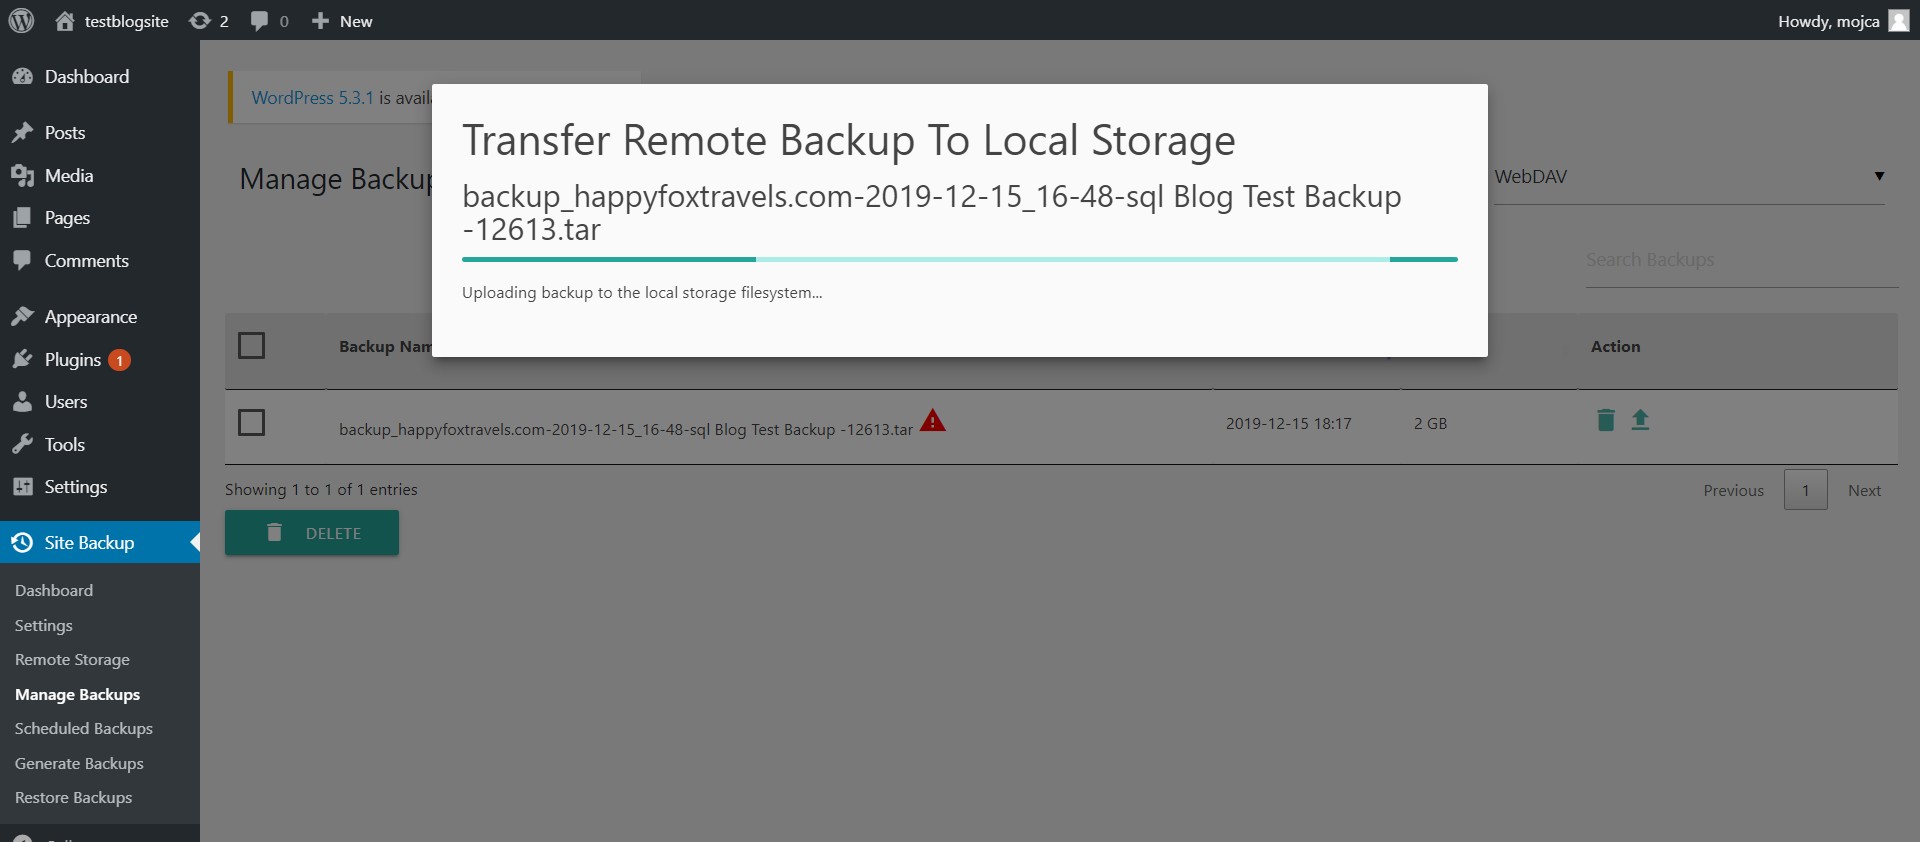
This will show you the list of all available backups that are waiting for you, stored in your Remote Storage account (your Koofr account). Click on the upward-facing arrow to Transfer Remote Backup to Local Storage. Depending on how big your backup is, this step might take a while.
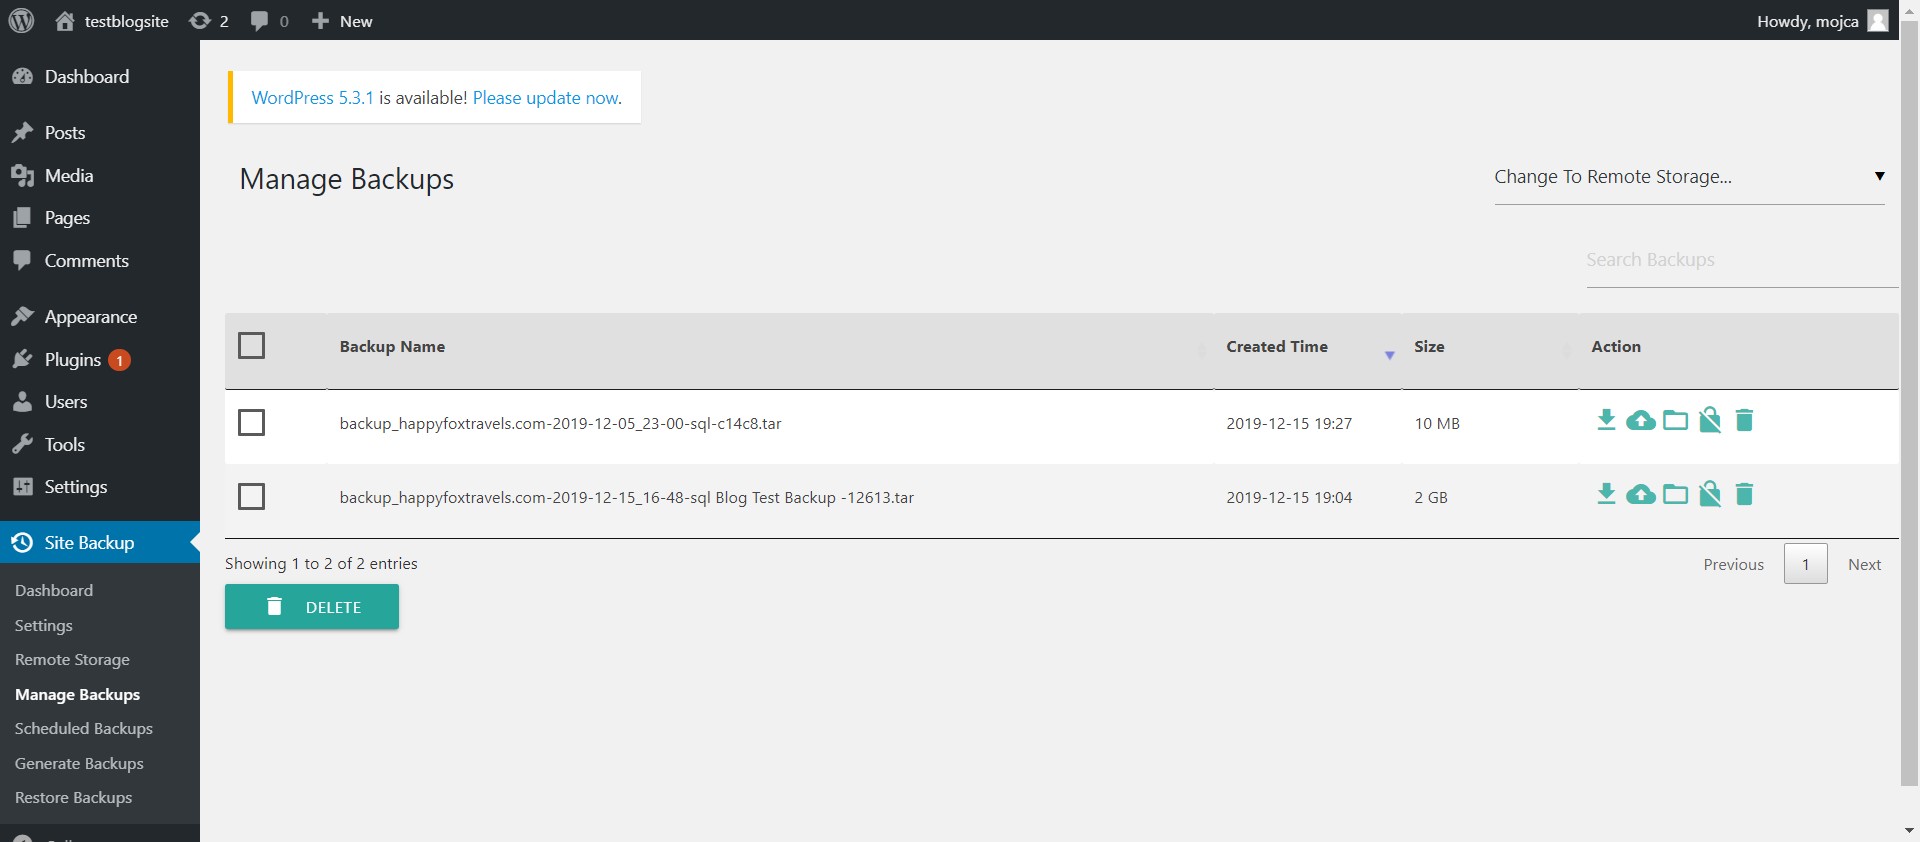
(4) When the transfer to local storage is done, you will see all your locally available backups under Manage Backups.
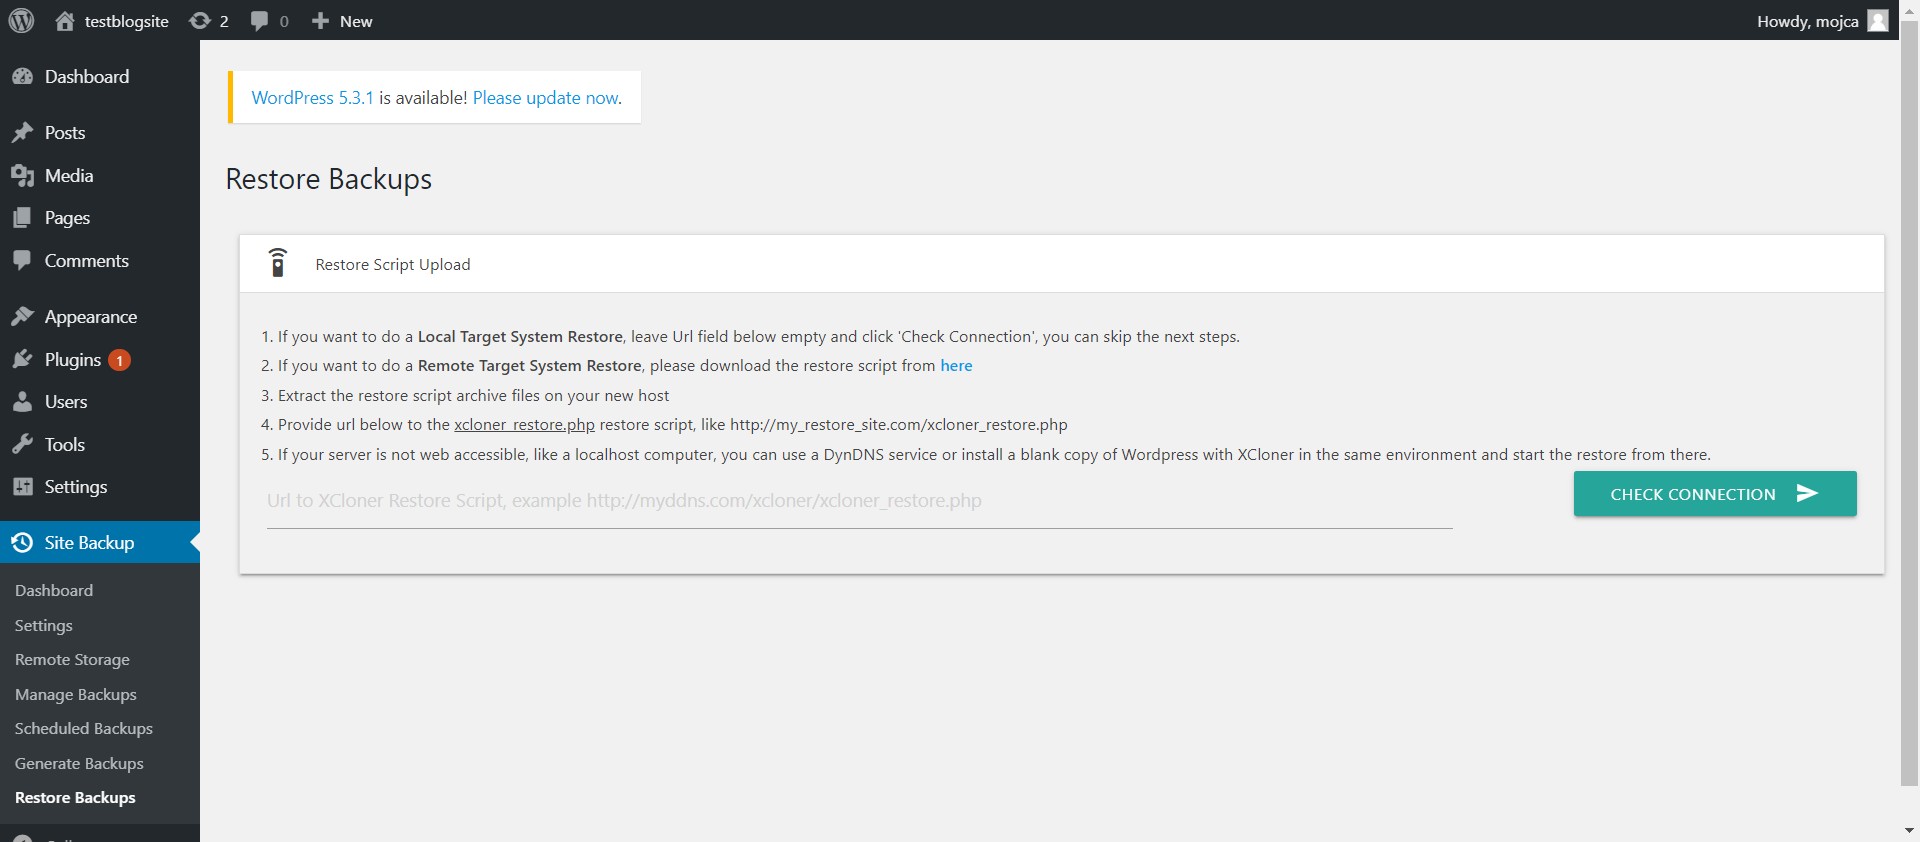
(5) Select Restore Backups from the Xcloner Plugin Menu. We went through the process described under the first point in the picture below - the Local Target System Restore. If you choose this option, you can click on Check connection immediately.
(6) Everything will be set up for you already in the next step.
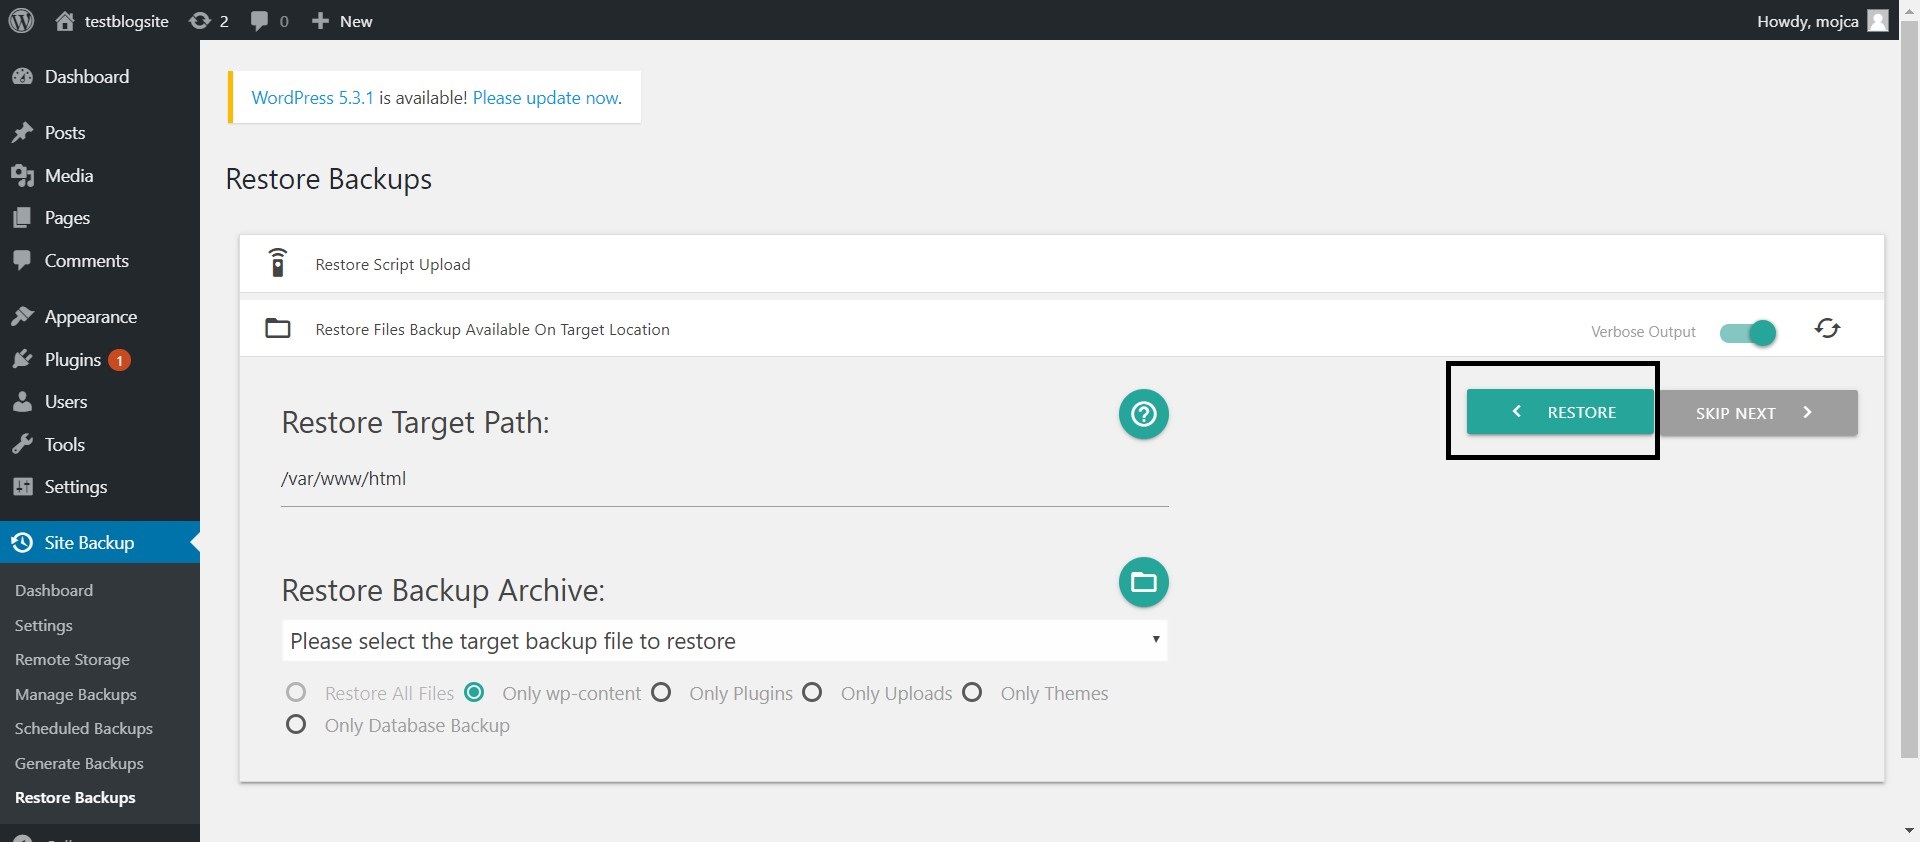
You just need to select the appropriate Backup Archive if you have more of them. We decided to restore the wp-content and database backup. You can do that in two steps repeating the process in the next sentence.
Select the wanted backup from the list and click on Restore. It looks a bit confusing since the Restore arrow is pointing left, but it is indeed the correct button to click on.
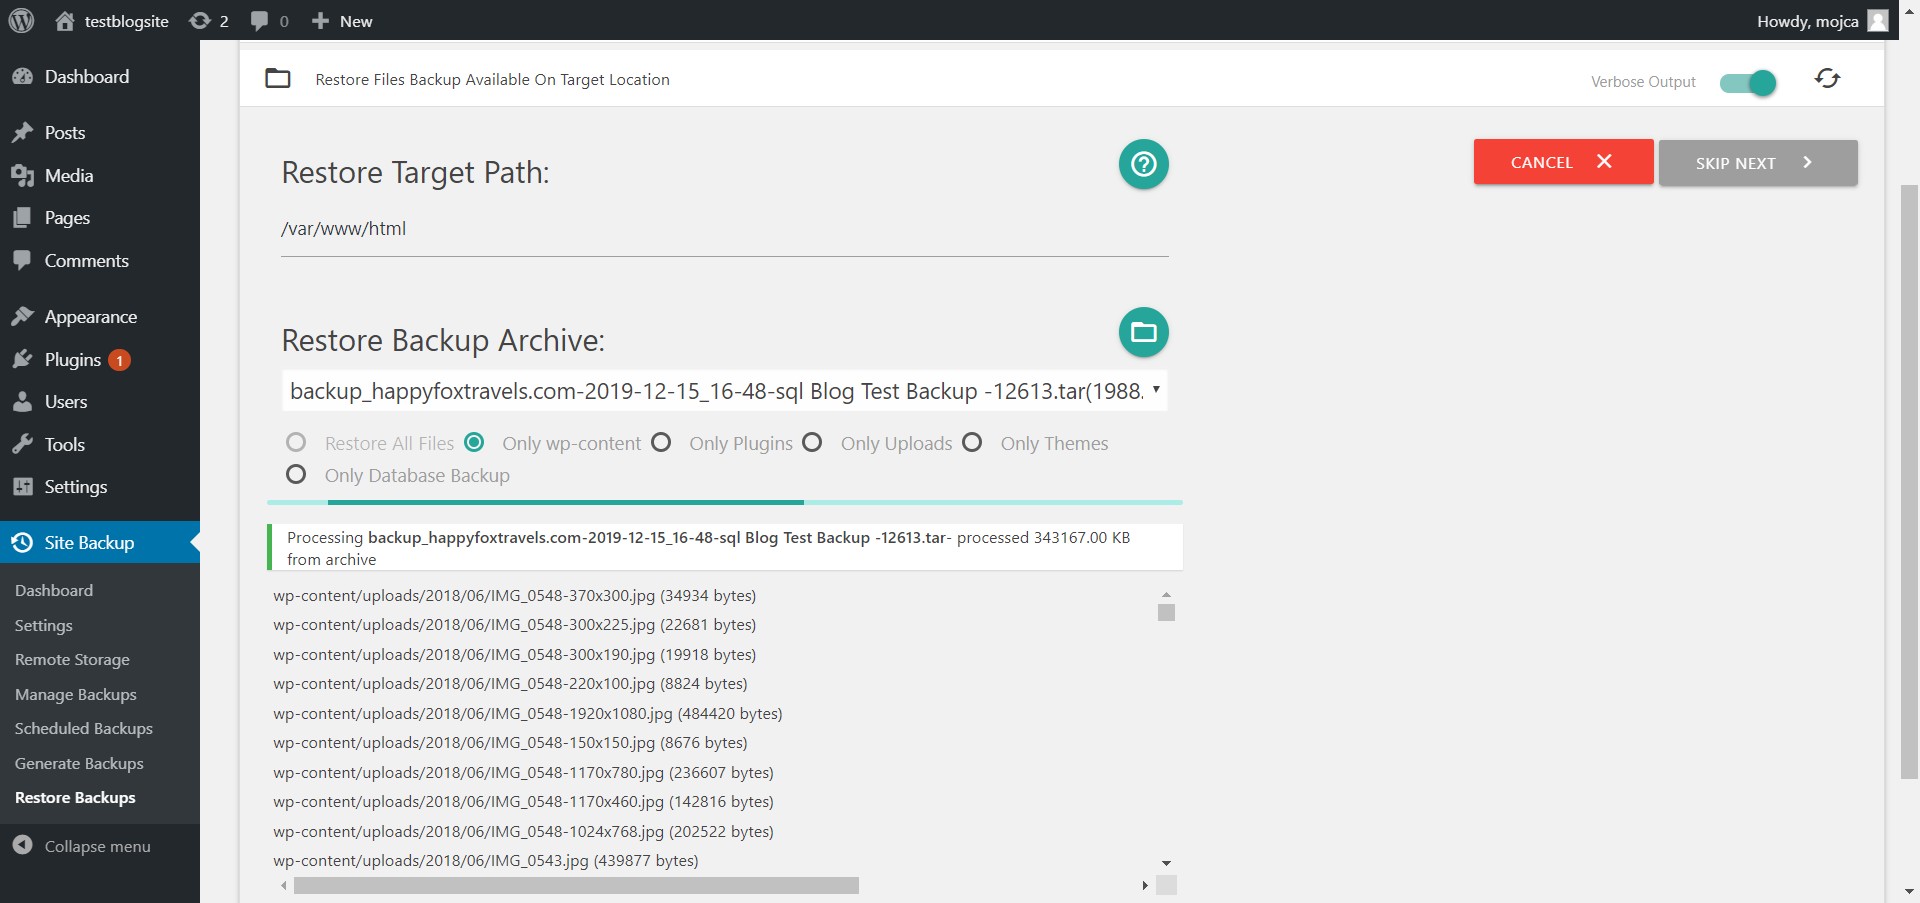
The restoring step might take some time, depending on the size of your backup. When everything you wanted to restore is restored, click on Skip next, which will take you to the next step.
(7) Everything needed should already be filled out and selected for you in the next step.
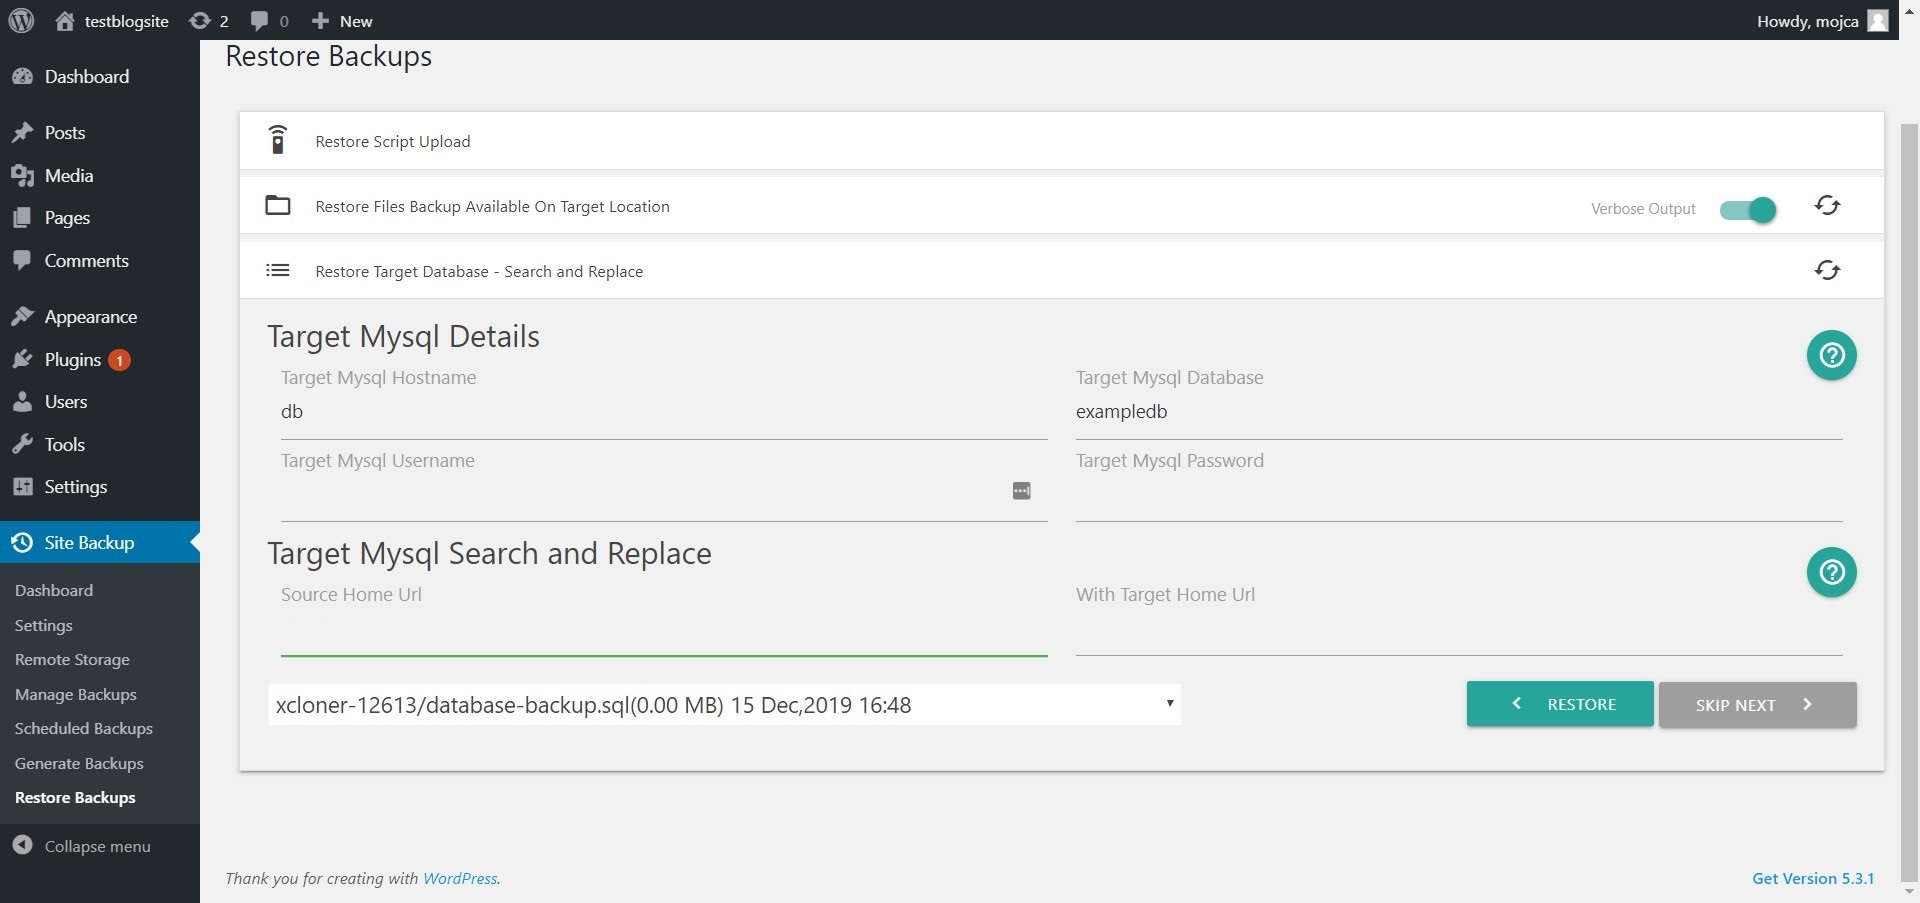
Be careful to type-in the appropriate Source Home Url under Target Mysql Search and Replace and the correct Target Home Url. When you are done, click on Restore again. When restore is done, click on Skip next to move to the last step of the restore process.

(8) You'll see Xcloner status is set to finishing up. When it is done, click on Open target site to see if everything was restored correctly to its previous form.
Note: We had some issues creating a full restore from our Xcloner backup files. Our test webpage got restored to about 90% of its original form. What was missing, in the end, were a few Widgets, that didn't restore correctly and were missing from the homepage of our test website.
Want to talk to us? Join us on the Koofr subreddit!